在开发过程中,大家可能同时拥有多个 Git 账号。比如你在公司使用 GitLab 来开发项目、在家使用 GitHub 开发自己的个人项目,但是如何同时管理多个 Git 账号成为一个问题。
本文将详细介绍如何在同一台电脑上管理多个 Git 账号,以便在不同的 Git 仓库之间可以灵活切换。
Table of contents
Open Table of contents
准备工作
在开始之前,请确保您已经安装了 Git,并且对 Git 的基本使用有所了解。
生成 SSH 密钥
对于不同的 Git 账号,我们需要生成单独的 SSH 密钥,假设你需要管理个人Github账号和工作的GitLab 账号。
- 为个人 GitHub 账号生成 SSH 密钥:
ssh-keygen -t rsa -C "[email protected]" -f ~/.ssh/id_rsa_personal
- 为工作 GitLab 账号生成 SSH 密钥:
ssh-keygen -t rsa -C "[email protected]" -f ~/.ssh/id_rsa_work
生成密钥的过程中会提示你输入「Enter passphrase」和 「Enter same passphrase again」,这里只要连续敲两个回车就行。
配置 SSH config 文件
编辑 ~/.ssh/config 文件(如果不存在则先创建),然后添加以下内容:
# Personal GitHub account
Host github.com-personal
    HostName github.com
    User git
    IdentityFile ~/.ssh/id_rsa_personal
    IdentitiesOnly yes

# Work GitLab account
Host gitlab.com-work
    HostName gitlab.com
    User git
    IdentityFile ~/.ssh/id_rsa_work
    IdentitiesOnly yes
对于公司 GitLab 账户来说,需要将 HostName 替换为正确的 GitLab 域名,如果公司域名指定了 SSH 端口的话,还需要另加一项
Port 对应端口号配置。
添加 SSH 密钥
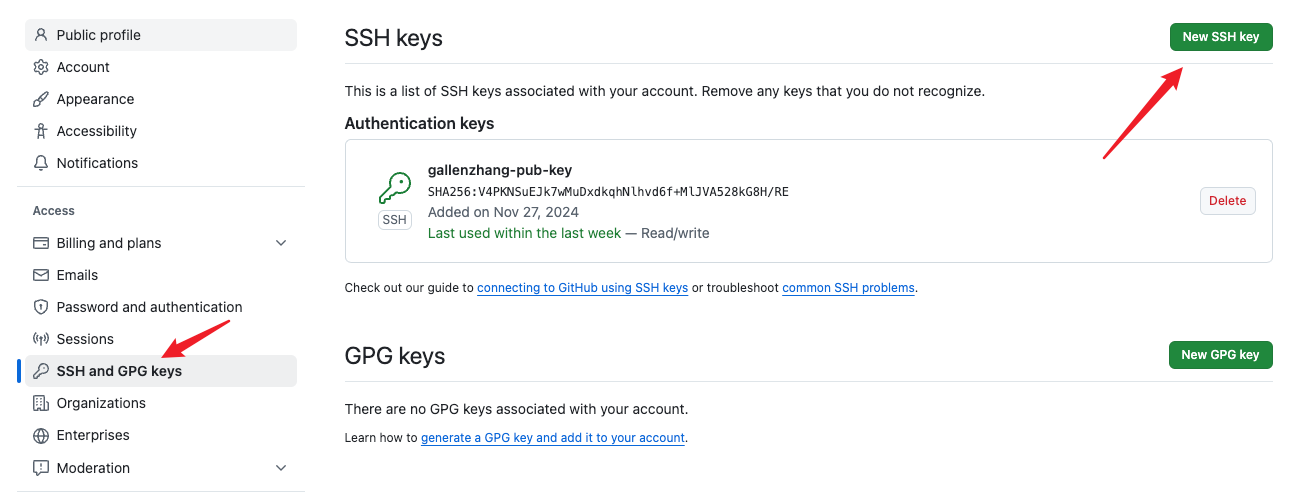
将个人 SSH 公钥添加到 Github平台上,然后类似的操作将工作 SSH 公钥添加到 GitLab平台上。只有添加好Git平台的密钥,后续拉取代码和提交代码才不需要输入用户名和密码。 这里就以添加个人SSH密钥为例,演示如何添加密钥到Github。
首先使用自己的个人账号登录Github,点击右上角点击头像,Settings -> SSH and GPG keys

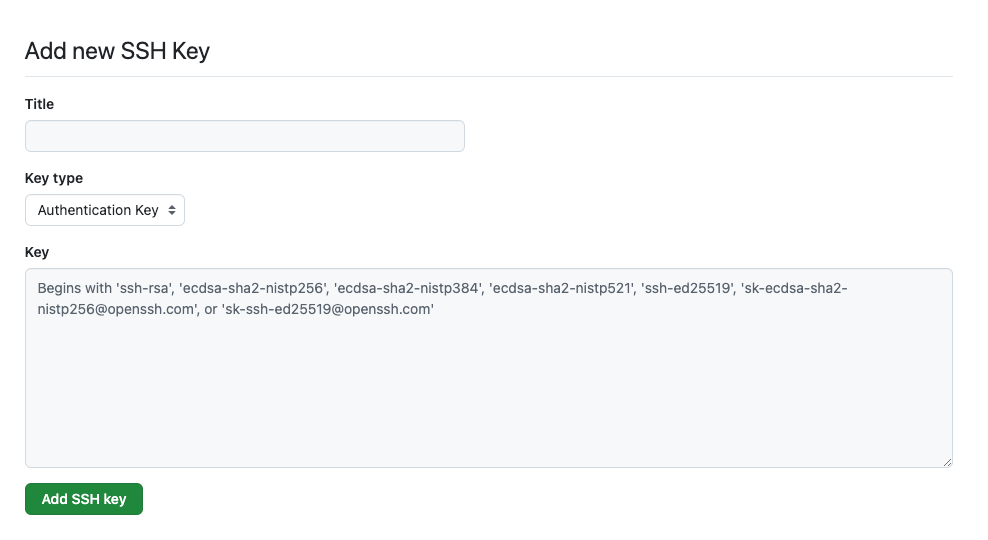
点击「New SSH key」就能将 SSH 公钥添加到 Github 平台,Title 填写一个方便自己识别的名字即可,将前面生成的 id_rsa_personal.pub 文件内容填充到 Key 里完成 SSH 密钥配置。

克隆代码
克隆仓库时要特别注意使用正确的 Host(与SSH config 文件要对应上),对于克隆项目仓库地址,使用 Host 替换掉原来URL里的域名,这样每次拉取代码或者推送代码,Git 会根据你使用的 Host 配置,自动选择正确的 SSH 密钥。
克隆项目
# 克隆个人项目
git clone [email protected]:username/personal-project.git

# 克隆工作项目
git clone [email protected]:company/work-project.git
仓库配置远程URL
# 个人项目
git remote set-url origin [email protected]:username/personal-project.git

# 工作项目
git remote set-url origin [email protected]:company/work-project.git
配置仓库的Git用户信息
除了全局设置之外,还可以针对每个不同的仓库单独设置用户名和邮箱。设置完Git仓库的用户信息后,每次提交代码时(git commit),Git都会把你的用户名和电子邮件地址记录到每次提交的元数据中,这些信息用于标识是谁做了这个提交。
全局设置
--global 选项意味着这些设置是全局性的,适用于你在该计算机上进行的所有 Git 仓库。Git 会把这些信息存储在你的 ~/.gitconfig 配置文件中。
git config --global user.name ‘xxxxx’
git config --global user.email ‘[email protected]’
单独设置
如果你只想为某个特定仓库设置不同的用户名和电子邮件地址,可以在该仓库中使用 --local 配置(或者直接省略 --local,因为默认就是 --local)。
# 进入个人项目仓库
cd personal-project
git config --local user.name "Your Personal Name"
git config --local user.email "[email protected]"

# 进入工作项目仓库
cd work-project
git config --local user.name "Your Work Name"
git config --local user.email "[email protected]"
查看Git用户信息
# 个人项目仓库
cd personal-project
git config user.name
git config user.email

# 全局配置
git config --global user.name
git config --global user.email
如何推送代码到不同的仓库
如果你希望将代码推送到多个仓库(比如一个是工作仓库,一个是个人仓库),你可以通过配置多个 remote 来实现这一目标。以下是如何将同一份代码推送到不同的 Git 仓库。
查看当前的远程仓库配置
首先,查看当前仓库的远程仓库配置:
git remote -v
通常,你会看到类似如下输出:
origin  [email protected]:your-username/your-repository.git (fetch)
origin  [email protected]:your-username/your-repository.git (push)
添加多个远程仓库
假设你有一个工作仓库和一个个人仓库,你可以为这两个仓库分别添加远程仓库。
# 为工作仓库添加远程仓库:
git remote add work git@github-work:your-work-username/your-repository.git

# 为个人仓库添加远程仓库:
git remote add personal git@github-personal:your-personal-username/your-repository.git
你可以使用 git remote -v 再次查看所有配置的远程仓库,输出示例:
origin    [email protected]:your-username/your-repository.git (fetch)
origin    [email protected]:your-username/your-repository.git (push)
work      git@github-work:your-work-username/your-repository.git (fetch)
work      git@github-work:your-work-username/your-repository.git (push)
personal  git@github-personal:your-personal-username/your-repository.git (fetch)
personal  git@github-personal:your-personal-username/your-repository.git (push)
推送代码到不同仓库
现在你可以将代码推送到指定的远程仓库。
# 推送到工作仓库:
git push work master

# 推送到个人仓库:
git push personal master
总结
在同一台电脑上管理多个 Git 账号并不复杂,通过合理配置 SSH 和 Git,可以轻松切换不同的 Git 账号。通过为每个账号设置不同的 SSH 密钥、用户名和邮箱,你可以在多个项目中使用不同的身份而无需手动切换。